As an online seller, your ultimate goal is to attract new buyers without driving up your marketing costs. You’re already grid posting and tweeting for traffic — but did you know you can attract real customers by getting your product in front of shoppers right when they’re looking for it?
Enter Google Shopping. This small but mighty tab on the Google Search Result Page showcases sellers’ products from around the globe, specifically ones related to your searches.
Being the largest search engine on the internet, Google is the ideal platform to show off your product to buyers, especially when their interest is already piqued. According to a Think With Google survey, 55 percent of people search for products to buy on Google.
In this article, we’ll take an
Сontents:
- What is Google Shopping?
- How Google Shopping Works
- Why Use Google Shopping?
- How to Sell on Google Shopping
- Everything You Need to Know About Google Merchant Center
- How to Set Up a Google Shopping Product Feed
- Paid Campaigns in Google Shopping
- What are Smart Campaigns?
- Automated Google Shopping
- How Much Does it Cost to Advertise on Google Shopping?
- How to Optimize Your Google Shopping Listing
What is Google Shopping?
Google Shopping is a dedicated shopping search engine powered by Google. Shoppers can use it to search for products from online merchants, compare prices, and purchase them safely.
These search results also show up in the form of image ads when someone enters a
Confused? Let’s take a look at these example search results for the term “bluetooth speakers”:
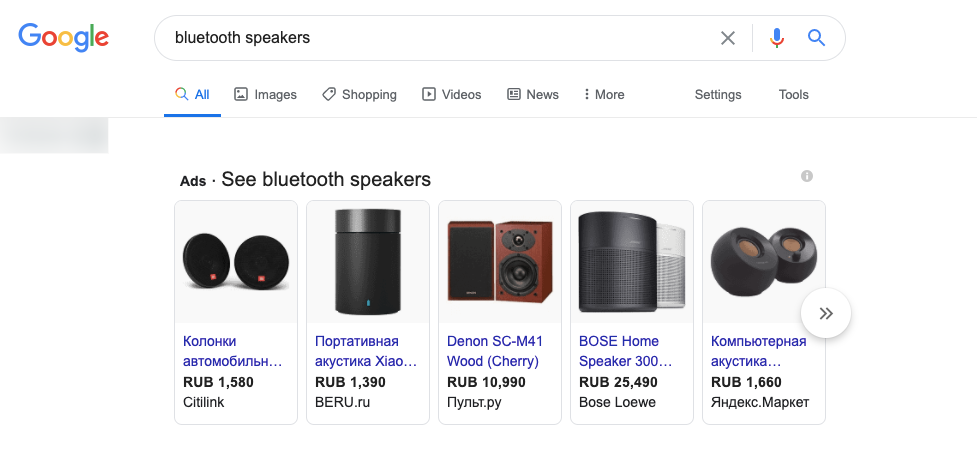
Google Shopping widget is always at the top of SERP
See the “Shopping” tab next to “Images” right below the search box? Clicking it will take you to the dedicated Google Shopping search at Google.com/shopping.
If you click any of the search results, you’ll be directed to the merchant’s site.
How Google Shopping Works
Retailers list their products on Google Shopping so they show up in their search results. Google promises that putting products on its platform will help “Reach hundreds of millions of people who do
In fact, you, the seller, can upload your entire inventory and start shopping campaigns, to maximize your chances of showing up for the right buyer.
Here are some highlights of the Google Shopping feature:
- Use Google’s Merchant Center to upload your products and manage your listings.
- If you have a physical store, get your product into local searches to generate foot traffic to your store.
- Generate reviews. Google places products with the highest ratings on the top of its page. Positive reviews can significantly increase conversions.
- Set up payments and delivery. Google offers payment options via Android Pay and delivery via Google Express to qualifying stores.
- Advertise. This is the heart of Google’s Shopping service — advertising for selected listings on your target queries. Google offers Smart Shopping Campaigns and Local inventory ads to get your ads traction across the web (and not just on target queries).
You can learn more about Google Shopping campaigns by listening to this podcast:
Why Use Google Shopping?
There are three main reasons why Google Shopping should be part of your traffic acquisition strategy:
1. Search volume
With over 3.5 billion searches per day, Google is the most visited website on the Internet.
Over half of these searches are for products. Your store can’t afford to miss out on a Google Shopping opportunity.
2. More clicks
The top organic result (i.e.,
However, since Google Shopping results are displayed before organic results, they get a bulk of the clicks for each search. The fact that you see a picture of the product and its price also drives up the clicks for each displayed product.
In fact, for most popular product queries, you can’t see any organic results above the fold. But you can see a whole bunch of Google Shopping results.
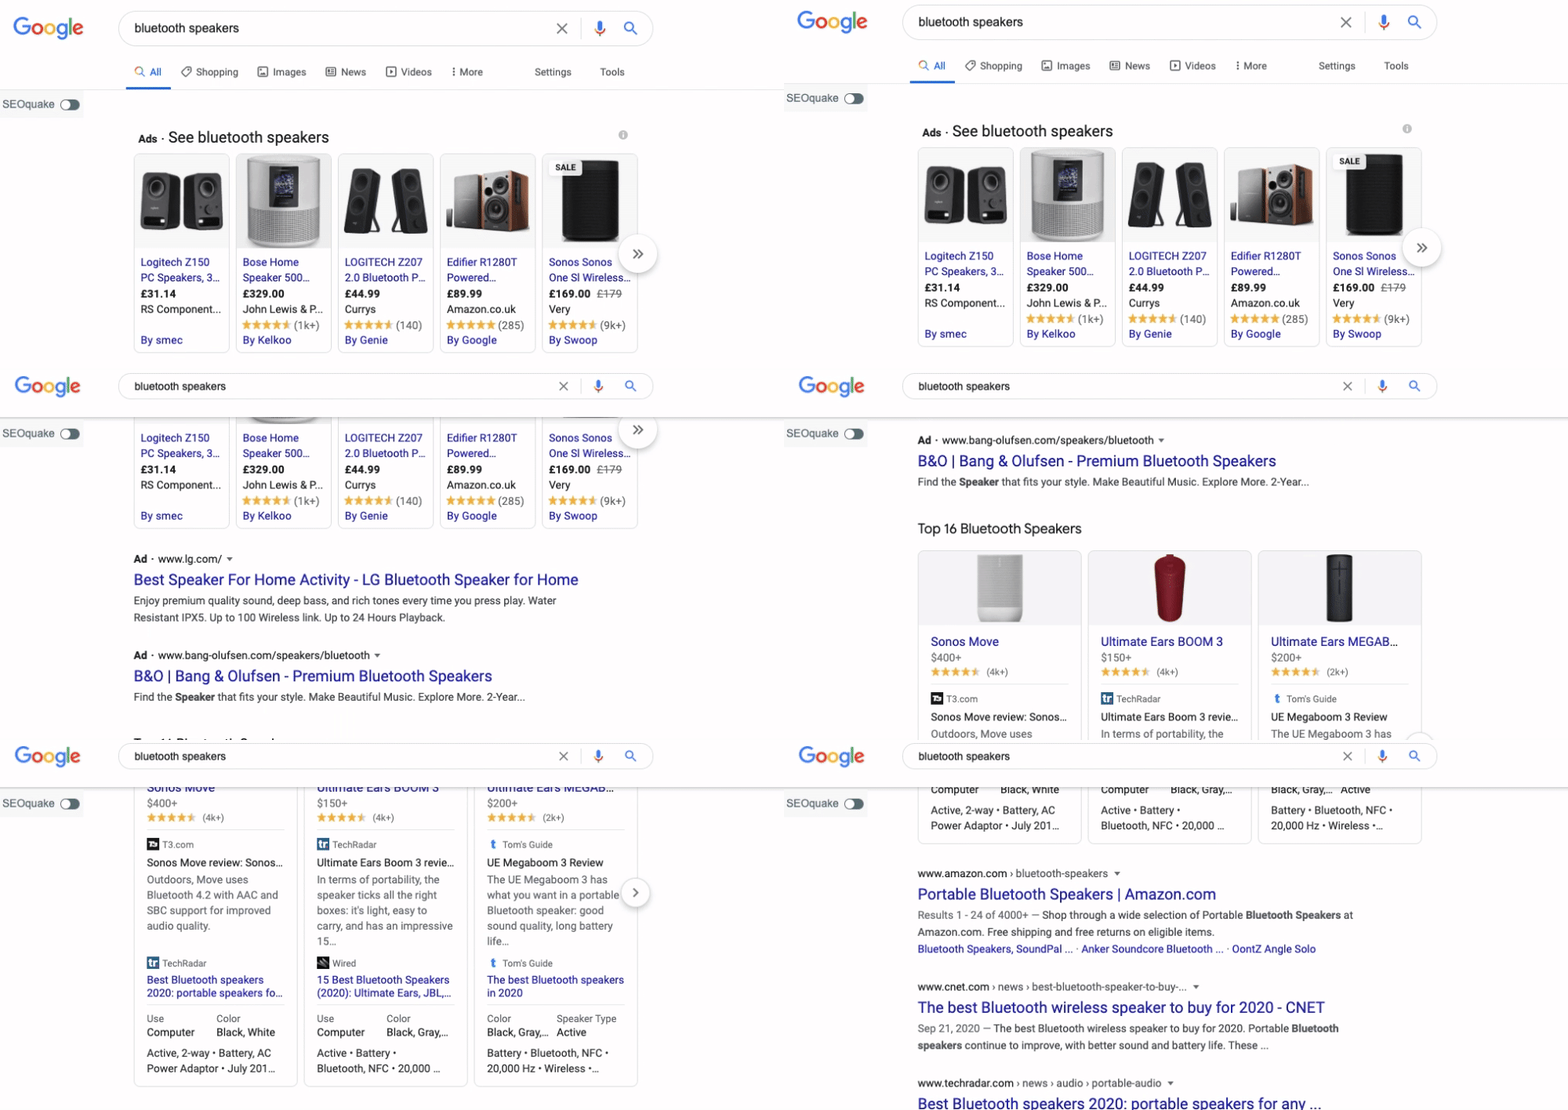
If you want targeted traffic from product queries, you’ll want to advertise on Google Shopping
3. Targeted traffic
As an online seller, you don’t want just any old web traffic; you want traffic that results in sales!
This is what makes Google Shopping so attractive for
When a shopper searches for “Bluetooth speakers under $100”, they aren’t casually browsing. The search’s specific terms probably mean that they are actively looking for Bluetooth speakers that cost under $100.
That means that listing your products on Google Shopping gives you access to far more targeted traffic than any other medium.
3 Ways to Sell on Google Shopping
Adding your products to Google Shopping has always been free. But showcasing them effectively to online shoppers costs money. Or at least, it used to. Until recently, the tool used the same approach to searches as Google Adwords. The products that were listed for free appeared in search results, but below the paid ads.
In April 2020, Google changed its policy and began to balance the top spots between promoted products and those listed for free, giving sellers a more equal opportunity for exposure.
Recently, Google announced that the sellers that participate in the “Buy on Google” checkout experience would no longer have to pay commission on transactions.
As a result, online stores have selling opportunities through Google Shopping, no matter their budget and business size.
Free listing on Google Shopping
Yes, Google Shopping is free. You can upload your products to the Google Merchant Center and have them listed in the Google Shopping Tab.
Start by signing up for Google’s Merchant Center. This will enable you to manage your listings and upload your products manually.
You’ll have to enter your website URL, your store name, and your country of operation. After entering these details, Google will ask you to upload a file to your server to verify site ownership.
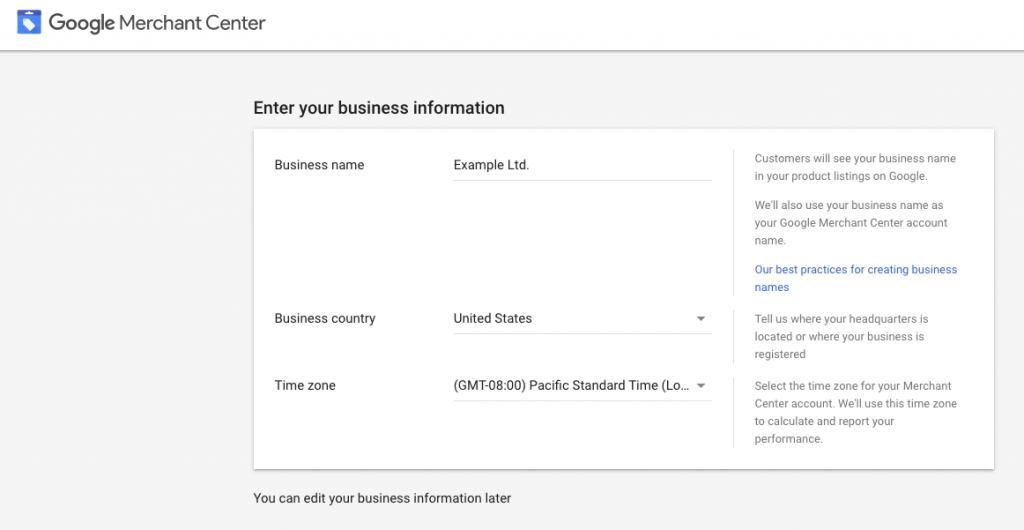
Identify yourself! You can edit this information later, by the way.
Getting your product to Google Shopping is an excellent opportunity for your business, but does it give you enough exposure to expect a significant spike in sales? Probably not.
Unfortunately, paid ads haven’t gone anywhere, and they still usually hold the top spots for product results.
To avoid frustration, treat free Google listings as the first step on your Google Advertising path. List your products for free and monitor their performance. This data will help you to reveal their potential and focus on the most profitable products with paid campaigns.
2. Paid advertising on Google Shopping
Paid Google Smart Shopping ads appear in front of potential and existing customers in the Google Search Network (next to search results, on Google Maps, Google Shopping, Google Images), Youtube, Gmail, and Display Network. The Google Smart Shopping service automates your bids and ad placements using machine learning; it figures out the best time and place to show ads to your potential and existing customers.
Note that Google Shopping integration doesn’t support Google beta countries. You need to sell to one of these supported countries. Your store should also meet Google Shopping Policies.
3. Automated Google Shopping ads with Ecwid
Setting up Google Shopping involves a lot of steps: setting up an account, waiting for approval, structuring campaigns, adding negative keywords, optimizing titles, images, and prices, troubleshooting if something goes wrong.
Ecwid wants to help you sell more in less time — which is why we launched a new service for all merchants: Automated Google Shopping! Now you can delegate the entire process to our professionals and keep your focus on selling.
To start selling on Google Shopping for free with Ecwid, you don’t need a Google Merchant account. You don’t need a Google Ads account. You don’t even need an
Everything You Need to Know About Google Merchant Center
Google Merchant Center is a
To start selling your products in Google Shopping organic listings, you’ll need to create a Google Merchant Center account and upload all your products (with images and descriptions) using a product feed.
Without this step, selling on Google Shopping is impossible. GMC also verifies your website ownership, calculates your taxes, and estimates the buyers’ shipping costs. The Merchant Center is free to use, whether you’re running Google Ad campaigns or not.
Uploading products to Merchant Center
There’re several ways to get your products to Google Merchant Center:
Integration. Most
Product feed. This is a file that contains all the necessary information about your products, their categorization, and their image locations. The product feed can be composed manually or automatically. This means you can create a file listing of all the information by yourself, or you can download the feed from your online store, if the platform allows it.
You have several ways to maintain your Merchant Center inventory using a product feed:
- Sync with Google Sheets. Keep the feed on your Google Drive and sync it with GMC. Every time you make a change in the feed, the change will reflect in the Merchant Center.
- Upload Excel regularly. If you prefer storing files on your computer, use Excel to create the table and upload it to Google Merchant Center when you need to update the product information.
- Schedule fetch. Store your product feed on the server and let the Merchant Center read it to update your product listings. You’ll need some technical skills to do this, but the workflow is fully automated and does not require manual work.
- Connect to API. Full product feed automation it is.
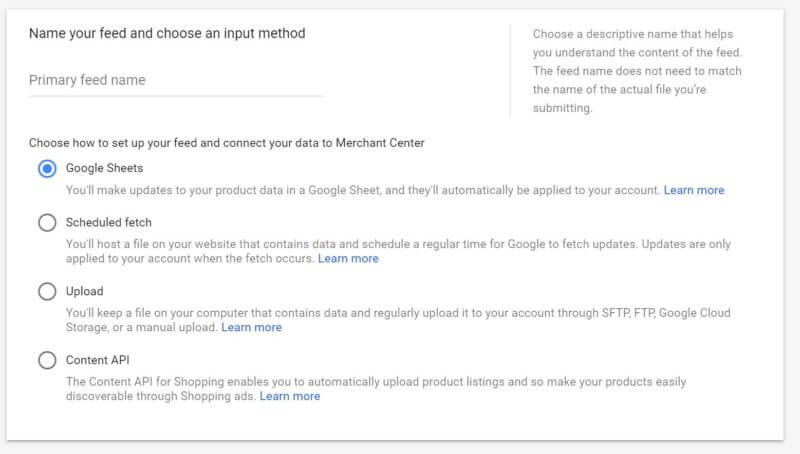
Choose the method that is easier for you to maintain
Here are the Product Feed templates provided by Google:
Local Promotion with Surfaces across Google
The Google Merchant Center allows physical store owners to showcase and sell products to local shoppers across Google services (local shoppers meaning those who reside near the seller geographically). This system is called “Surfaces across Google.”
The “Surfaces” include:
- Google Search
- Google Images
- Google Shopping
- Google Maps
- Google Lens
(availability of listing types for each Google surface varies by country. Learn more.)
To take advantage of free listings on Google surfaces, the businesses have to
Click Growth and then Manage programs in the left navigation menu. Then, click the Surfaces across Google program card, and follow the instructions.
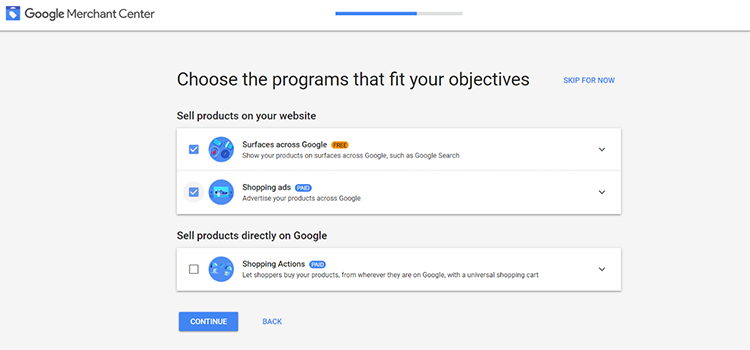
Pro tip!
Google advises to create a separate feed for your local listing and upload it daily.
“Shopping Actions” in Google Merchant Center
In the same list of the programs, you will stumble upon another option — Shopping Actions. What’s that?
Google Shopping Actions is a program that enables merchants to sell products across Google services by letting Google directly accept payments. This way, buyers won’t have to visit your store and will complete the purchases right in the Google Shopping tab.
To denote the products that are available to purchase from the shopping tab, Google shows a shopping cart icon on listings from retailers that participate in Google Shopping Actions. Google also has separate “Buy on Google” filters on mobile and desktop.
Retailers of all sizes can sell their products directly on Google, with zero Google commission fees, through the “Buy on Google” checkout experience. Retailers can work with their own
Here’s how Shopping Actions works:
- A shopper finds your Shopping Actions listing;
- The shopper completes the purchase using “But on Google”;
- Google collects the full price, adds taxes and any shipping charges;
- Google sends the order to you in Google Merchant Center;
- Google sends you the money;
- You pack and ship the product to the customer.
The Shopping Actions program is currently only available in the United States and France. But it’s going to expand significantly in 2021.
Read more about how to participate in Google Actions for free in Google Help Center.
Tracking Efficiency in Google Merchant Center
Merchant Center has a
If you want to sync the Merchant Center to your website sessions, and find out whether that click leads to a purchase or not, you will need to use Google Analytics.
Sounds easy, right? Sorry to disappoint you. GA treats incoming sessions from Google Shopping as “google/organic,” making it impossible to detach them from the rest of their regular search sessions.
Fortunately, there’s a way to work this issue around — UTM tags. You can tag your product links right in the feed or using Feed Rules in Google Merchant Center. In Google Analytics, make sure to uncheck the manual tagging override in the Advanced Settings option of the Property settings.
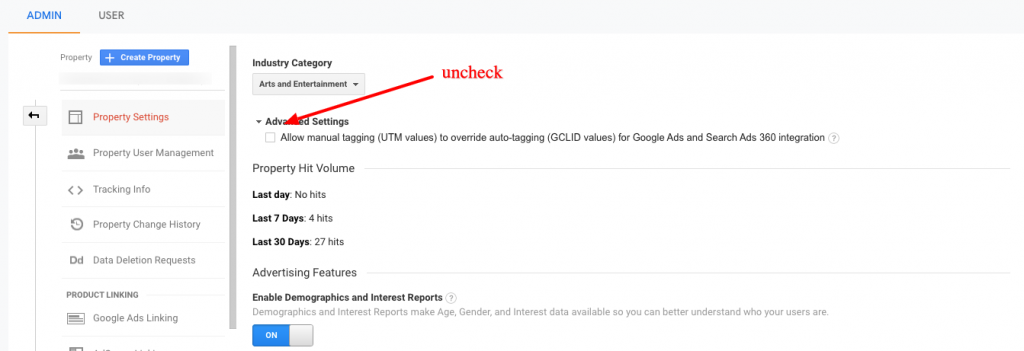
Uncheck the manual tagging override in the Advanced Settings option of the Property settings to track Google Shopping conversions
Still confused? These articles can help you out:
- How to Track Surfaces Across Google (Free Shopping Ads) Revenue in Google Analytics.
- Understanding how UTM tags work.
- Google Analytics guide with advanced tips on tracking and automation.
The cost of using the Merchant Center
Nothing! You heard us, the Google Merchant Center is free to use. But running ad campaigns will cost you money. Continue reading to find out how much.
Before Uploading Products to Google Shopping
Before you upload your product feed to Google Merchant Center, you need to make sure that your store meets the Google Merchant Center requirements.
Get your store ready
Accurate contact information. You need to display accurate contact information on your store website, including a physical address, a phone number, and/or an email address.
Refund Policy and Terms of Service. Ensure that you have a clear and easy to find Refund Policy and the Terms of Service page on your store website.
Secure checkout process. Ensure that your website is
Language and currency. When submitting your product data to Google Merchant Center, you need to use the language and currency of your target country. Check the list of currencies and languages by country if you are unsure what language and currency you are supposed to use.
Shipping and tax settings. Your Google Merchant Center account must have the same shipping and tax (US only) settings as you have in your Ecwid store. This way, customers see the exact price they’ll have to pay, including the shipping and tax fees, on your Google Shopping Ads.
You can determine how to set up shipping and taxes in your Google Merchant Center in these guides: Set up shipping, Set up taxes (US only).
Verify the ownership of your website
Before uploading your product data to Google Merchant Center, you are required to verify the ownership of your website and prove that you are an authorized owner of it.
To claim your Ecwid Instant Site domain, follow the guide’s steps: Verify Ecwid Instant Site in Google.
How to Set-up a Product Feed in Google Merchant Center
There are several ways to add your products to Google Shopping:
- Create a feed manually.
- Generate one with your
e-commerce platform. - Use a
3rd-party to do the heavy lifting.
DIY for the win
Google provides a detailed Onboarding Guide on how to get your Merchant Center ready for action. But here are the highlights:
Stage 1. Business settings. You will need to provide your business information, configure checkout preferences (check out on your website, on Google, at your local store), associate your account with your website platform, and choose email preferences.
Stage 2. Inventory panel. You’ll then upload the feed and see how your products will look in Google Shopping.
Stage 3. Finalize the setup. Add your tax information, set up shipping, verify your website, confirm that your website and URL belong to you, sign up for Google Surfaces and Shopping Actions.
Stage 4. Start promoting. Create paid ads, communicate with customers, run sales, trace conversion, optimize performance.
As soon as you access the Merchant Center, the onboarding process will help you set up your account and get your products online. However, if you need more info about the process or the benefits of specific options, visit the Google Merchant Center Guide.
Download it with Ecwid
If you’re looking for a quicker setup, you can use a ready XML feed file with your product data, upload it to Google Merchant Center, and build your ad campaigns from there.
To generate a product feed for Google Shopping:
- Go to your Ecwid Control Panel → Other Channels → Google Shopping.
- Click Generate Feed.
- Select the Marketplace category where you want to submit your items.
- Choose the Product condition for your goods.
- Click Save.

We all love magic buttons!
Ecwid generates the feed within seconds. When the feed is complete, you will see a feed URL that you can copy to your clipboard. You’ll need to submit this feed URL in Google Merchant Center.

You dont even need two hands to do this
To upload the feed to Google Merchant Center:
- Sign in to your Google Merchant Center account.
- Navigate to Products → Feeds.
- Click the New feed (Plus) icon.
- Select the Target country and Language and click Continue.
- Assign the Feed name and select the Scheduled fetch upload. Click Continue.
- Provide the Feed file name. Do not use the Feed URL for this field.
- Set the Fetch frequency and the Fetch time. Keep in mind that Ecwid regenerates the feed every 5 hours.
- Set your Timezone.
- Provide the Feed URL that you copied in your Ecwid Control Panel. Click Continue.
Give Google a few minutes to fetch and process your feed. After that, you will be able to view the feed properties and check for errors. Check out the Troubleshooting section to see common feed errors and learn how to fix them.
To see the full instruction on uploading an Ecwid generated product feed to the Google Merchant Center, visit our Help Desk.
Running Paid Campaigns on Google Shopping
To start advertising on Google Shopping, you will need to connect your existing Merchant Center account with a Google Ads account.
If you don’t have one, what are you waiting for! Create one by visiting the Google Ads web page.
Pro tip!
On the following screen, choose to Switch to Expert Mode to see more options. Select Create an account without a campaign to save time on this stage.
When you have things set up in Google Ads, go to the Merchant Center.
- Find Set up Shopping Ads on the dashboard and click Continue.
- Scroll down to Google Ads account and click Link your account.
- In the list of available accounts, click LINK.
- Return to Google Ads account and refresh the page.
- In the Bell icon on your top right, find the Merchant Center’s notification and click View.
- You will see the message about Merchant Center attempting to link to Google Ads account with the status Pending. Click VIEW DETAILS.
- In the open request details, choose the option APPROVE.
- Return to the Merchant Center and also refresh the page.
- Done!
Create your first Google Shopping campaign
With the Merchant Center and Google Ads accounts set up and linked, you’re ready to start your first promotion campaign on Google Shopping!
Advertising is a fascinating but complicated world, involving numerous settings, options, and opportunities to mix and match these settings.
Sounds like a lot? Well, we’ve provided a shortcut:
We recommend watching a comprehensive video tutorial by Darrel Wilson, who teaches people how to make websites (mostly on WordPress) with no coding skills by creating free tutorials. Check out this one about Google Shopping tutorials (Skip to 28:47).
What is a Smart Campaign in Google Shopping
The Google Smart Shopping service uses machine learning to automate your bids and ad placements to maximize your advertising investment. It uses your product feed and other advertisers’ experience to display your ads at the best time and place to potential customers.
Smart Shopping program combines all relevant information about your product, digital assets (like a website), and your business. The program then analyzes it to automatically create a variety of ads across Google networks. It tests different combinations of the image and text to find the most relevant ads with the highest efficiency achieved across the Google Search Network, the Google Display Network, YouTube, and Gmail.
Smart Shopping campaigns can track events such as online purchases, signups, purchases from phone calls, and store visits as conversions for further optimization. The system continually tries to maximize conversion value for the daily budget you set, automatically.
Smart Shopping campaigns feature product shopping ads, local inventory ads, and display ads (including dynamic remarketing and dynamic prospecting).
Create your first Smart Shopping campaign
If you don’t know how to start a Smart Shopping campaign, here’s a simple
- Sign in to Google Ads.
- In the page menu on the left, click Campaigns.
- Click the Plus button, then select New Campaign.
- Select Sales as the goal for your campaign, or choose to create a campaign without a goal’s guidance.
- For “Campaign type,” select Shopping.
- Select the Merchant Center account that includes the products you’d like to advertise.
Important: Each campaign can only be linked to one Merchant Center account and can only have one country of sale.
- For “Campaign subtype”, select Smart Shopping campaign, then click Continue.
- Create a name for your campaign.
- Set an average daily budget.
Important: Smart Shopping campaigns take priority over other Standard Shopping and display remarketing campaigns for the same products. To retain your overall spending, it is recommended that you set a budget that is equal to the sum of those other campaigns.
- Bidding. By default, Smart Shopping campaigns set bids that maximize the value of your conversions within your provided average daily budget.
- If you have a specific performance goal, add a target return on ad spend (ROAS).
- Choose specific products or groups of products that you’d like to advertise in your campaign. The more products you add to a single campaign, the simpler it is to manage, and the better it is expected to perform. If you do not designate specific products or groups, all of your products will be eligible to appear in your ads.
Important: Unless you have very different ROAS goals or budgets for specific products or groups of products, it is recommended to include all of your products in a single campaign.
- Upload assets, such as a logo, image, and text that will be used to create responsive remarketing ads for the Display Network and YouTube. Your assets will automatically be combined in various ways to create ads, and those with the highest performance will show more often. See the panel on the right for previews of how your ad might show. Upload the following assets for your ads:
- Logo: If your logo has already been uploaded to the Merchant Center, no additional action is needed. Square logos need to have an aspect ratio of exactly 1:1. Rectangular logos need to be wider than 1:1 but cannot be wider than 2:1. For all logos, a transparent background is best, but only if the logo is centered.
- Image: Upload a marketing image that represents your business. Choose a landscape image with a ratio of 1.91:1 that is also greater than 600 x 314 pixels. The recommended size is 1200 x 628 pixels. The file size limit is 1MB. Text may cover no more than 20% of the image. Note: To fit in some ad spaces, your image may be cropped
horizontally—up to 5% on each side. - Text: Add text that details your business. This text will be used in various combinations and ad formats.
- Short headline (25 characters or fewer) is the first line of your ad and appears in tight ad spaces where the long headline doesn’t fit. Short headlines may appear with or without your description.
- Long headline (90 characters or fewer) is the first line of your ad and appears instead of your short headline in larger ads. Long headlines may appear with or without your description. The length of the long headline, when rendered, will depend on the site it appears on. If shortened, the long headline will end in ellipses.
- Description (90 characters or fewer) adds to the headline and includes a call to action. The length of the rendered description will depend on the site it appears on. If shortened, the description will end in ellipses.
- Final URL: Enter the URL address of the page on your website that people go to when they click on your ad.
Important: These assets will be used to create ads to show users who have visited your website but have not yet expressed interest in a specific product. Once user interest has been indicated, relevant data will be pulled from your product feed to create an ad.
- Preview some of your potential ads. Since responsive ads are built to reach across almost any ad space on the Display Network, they can show in thousands of layouts.
- Click Save.
Congratulations! Your first Smart Shopping campaign is ready. Give it some time to learn and optimize to your budget, products, and goals.
Read: How Soundwave Art Earned 415% Return with Google Smart Shopping and Ecwid.
4 easy ways to maximize Smart Shopping campaign profitability (by Google)
1. Focus on revenue
If your primary goal is to maximize conversion or revenue, create a separate Smart Shopping campaign for each product type you have: one each for sneakers,
2. Prioritize inventory
Having individual Smart Shopping campaigns for different product types, you can easily define the Smart Shopping budget shares for each of the campaigns. Boost the most profitable campaigns by giving them the largest share of your total budget.
You can also create a special campaign for products that are available for a limited period, like the Holiday season. The Smart Shopping campaign algorithm will then prioritize it during the peak period.
3. Increase profitability
If some of your products are more profitable than others (those with higher margin), you can create a separate campaign for those products. It’s a simple way to make a Smart Shopping campaign more efficient and profitable. Google advises using Custom labels to mark the most profitable products and to make it easier to unite them into a separate campaign later.
Don’t forget to decrease the target ROAS (return on ad spent) to generate more demand for your product and increase profitability.
4. Maximize reach with releases
If you’re launching a new product (or even a new brand), you want to get the word out as quickly and effectively as possible. In this case, you might want to launch a campaign for the new product(s) with low ROAS. This way, the ad’s reach will grow significantly, allowing more shoppers to see your exciting product(s).
Watch the following demonstration (1:12)
Cut Corners: Automated Google Shopping Ads (hands-free money-making)
You can save plenty of time with ad campaign management by enabling the automated Google Shopping for your store. You can delegate the entire feed submission and management process to professionals and focus on fulfillment.
A handy integration of Ecwid and Google (powered by Kliken) can help you run
Check out what we have to offer.
With Automated Google Shopping, you won’t have to go through the trouble of: setting up an account, waiting for approval, structuring campaigns, adding negative keywords, optimizing titles, images, and prices, troubleshooting if something goes wrong — we’ll do everything for you.
Just select the right package and you’re ready to launch a
| Free |
|
| Basic $150/mo |
|
| Essential $300/mo |
|
| Premium $500/mo |
|
There is also the monthly automation fee of $20 that comes with the packages and covers the creation and management of your Google Merchant Center for Free Listings/Google Smart Shopping as well as daily feed updates, smart feed optimization, adding eligible products on Google Surfaces, and unlimited Smart Shopping campaigns with no management fees.
The setup of Google Shopping ads is fully automated by Ecwid and Kliken, and takes a few clicks:
- From your Ecwid admin, go to Marketing → Google Ads.
- In the Automated Google ads section, click Enable.
- Pick a country (you can only select one country per campaign) and a language (your ads will be shown to people who have chosen this language in their browser settings):
- Click Continue to Categories. Pick the right Google category for your store to make sure your ad shows up in the right search results. Then select the condition of your products (New, Refurbished, or Used).
- Click Continue.
- Choose what products you want to advertise. If you don’t use categories in your Ecwid store, all products will be automatically selected for ads. If you want to promote specific products only, put them in categories in your store first, and then select these categories for the campaign:
- Click Continue to Store Review.
- If any errors are indicated, click View Details and follow the instructions on fixing them, then click the I fixed this, Refresh my store button.
- Click Continue to Preview to see how the ads will look like.
- Click Get my store on Google Shopping.
- And voila! Your ads have been created!
It usually takes between
Want more expertise to guide you? Listen to our podcast episode with Ricardo Lasa. Lasa is the founder of Klicken, and a mastermind of the
How Much Does it Cost to Run Ads on Google Shopping?
The answer is simple: as much as you want to spend.
Google gives you maximum flexibility with the budget as it doesn’t have a minimum limit for bids and daily budgets. You can launch a campaign with as low as $0.01 for a click. Though, we doubt this is the most effective way to bring in revenue.
Some stats: The cost of a click for the Google Shopping ads is usually below $1. The average small business advertising budget is somewhere between
Based on this, your minimum monthly Google Shopping budget might be around $1,350 if you’re planning on using outside help.
Predictable pricing and results
There’s a way to evade uncertainty with ads campaigns and know the process instead of guessing at it
The benefits:
- If you don’t have a Merchant Center account, Ecwid creates one for you and connects a valid product feed right from your Ecwid store.
- You can manage products in the Ecwid control panel while we sync your inventory with Google Shopping listing.
- Ecwid concentrates its efforts on ROAS (Return of Ad Spend), to maximize every dollar.
- Ads are spread across the Internet and Google Surface, meaning exposure on Google Images, Google Search, Google Shopping tab, YouTube, Gmail, and even Google Lens.
- Despite the powerful automation of your Ecwid powered selling machine, you will always have a human by your side to support, check, and optimize your results.
- Better results faster with automated solutions, like Google Ads Smart Bidding and Smart Creative.
How to Optimize Your Google Shopping Listing
You’ve now added your products to Google Shopping and probably launched your first ad campaign. But there’s still one piece of the Google Shopping puzzle left: optimization.
Optimizing your Google Shopping listing will help you get the most out of your ads. Remember: Google Shopping ads work like any conventional AdWords ad. Your CPC (Cost Per Click) is decided not only by your bid but also by your CTR, target ROAS, ad relevance, and more.
Let’s take a look at what you can do to optimize your Google Shopping listing.
Create an informative listing title
Your listing title is the primary source of information your shoppers have. So it’s a must to create titles that inform shoppers about your product and meet their expectations. For example, a customer searching for a specific brand will expect to see brand names in titles. If they don’t, they might skip over your listing.
Also, make sure to follow good SEO practices. The general rule of thumb is to place important keywords at the beginning, and less relevant terms at the end of the title. Google weighs initial keywords far more heavily.
See an example with “blue patagonia jacket” below:
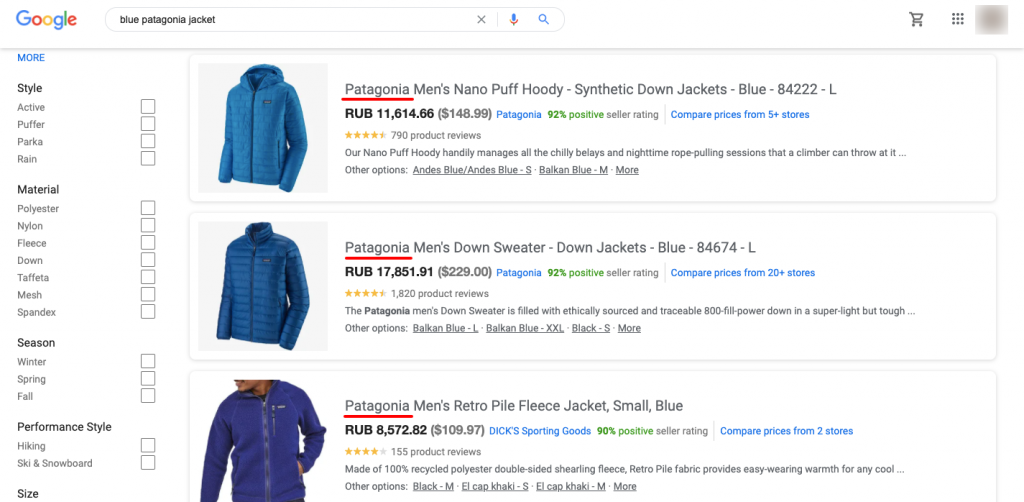
You can see that the brand name “Patagonia” is more critical for titles than the color
Generally, a good listing format to follow is brand → gender → product → color → size. Only switch up this order when search results aren’t filtered by brand first.
Add special offers
Special offers help shoppers distinguish your listing from others. They are displayed by simply adding text at the bottom of your listing to catch your shopper’s eye. Offers tempt users to
Take a look at the product listings for “high heels wedding”:
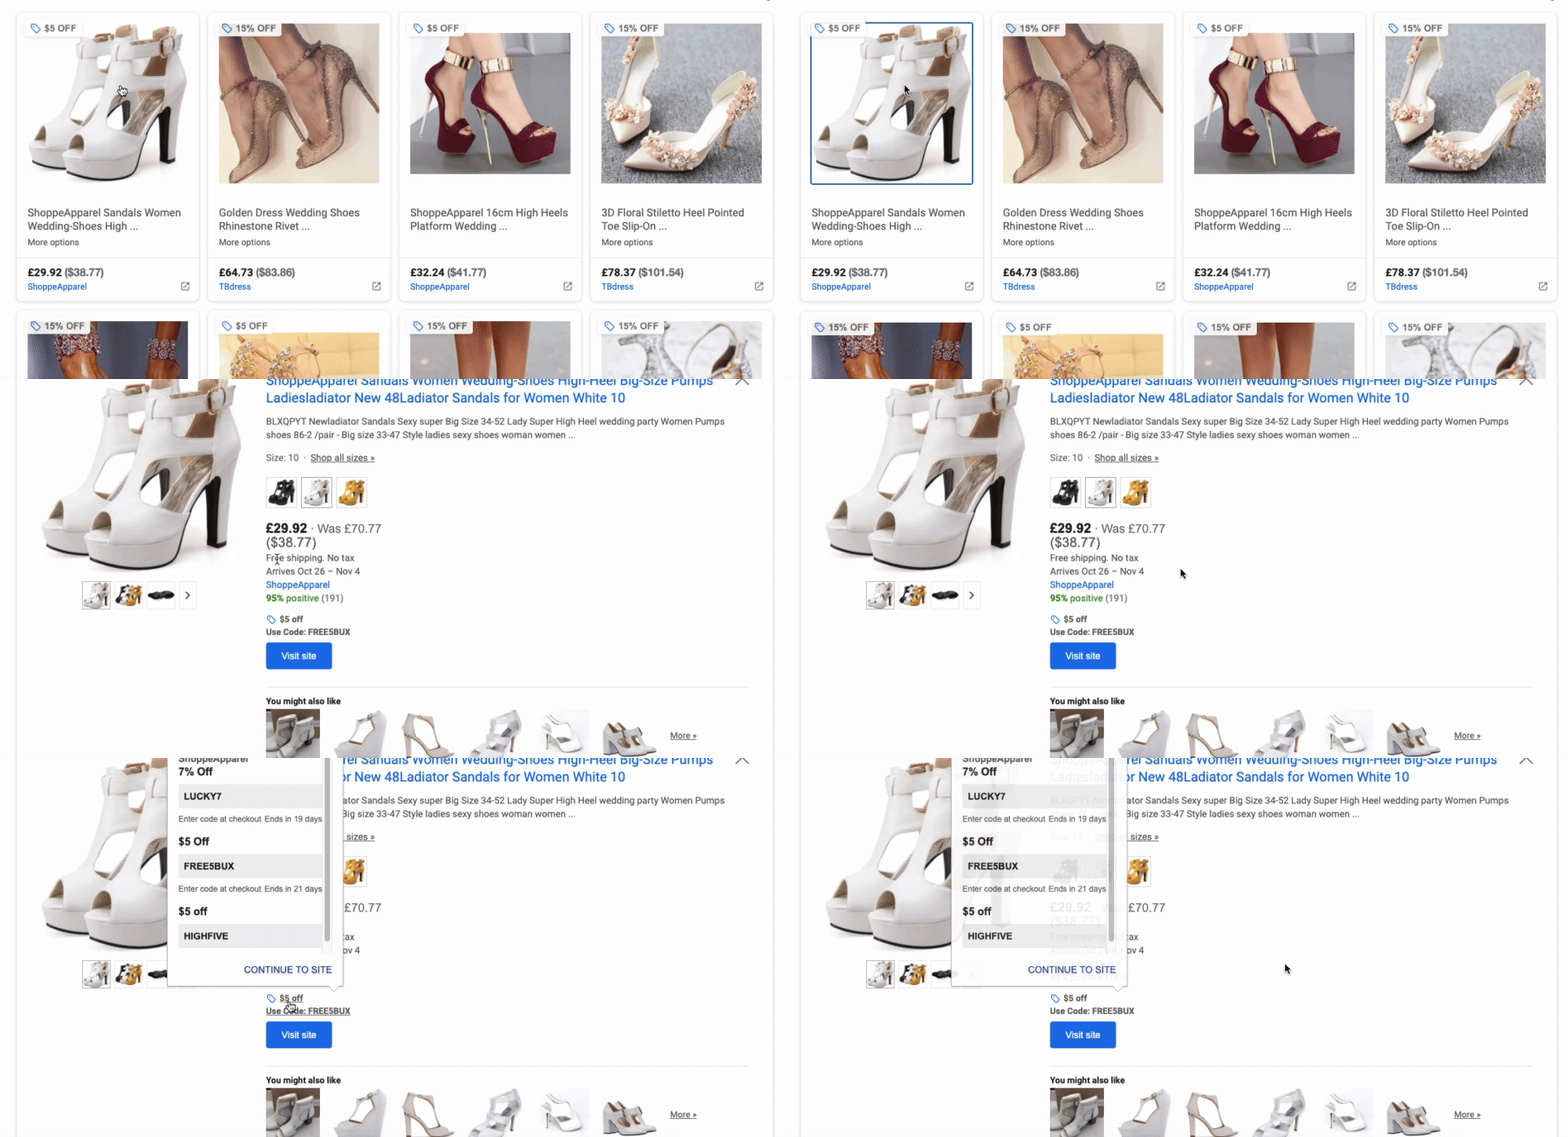
You can create an offer in a variety of ways. For example: free shipping, coupon codes, or contest giveaways (on your site). Remember to add an expiration date on your offers to create a sense of urgency.
Add reviews
Reviews have become an integral part of the online shopping experience. Studies show that shoppers read reviews before making a purchase. Adding reviews to your listing is a great way to improve your offer as they serve as proof of quality right on your listing.
Reviews allow you to communicate that your product is
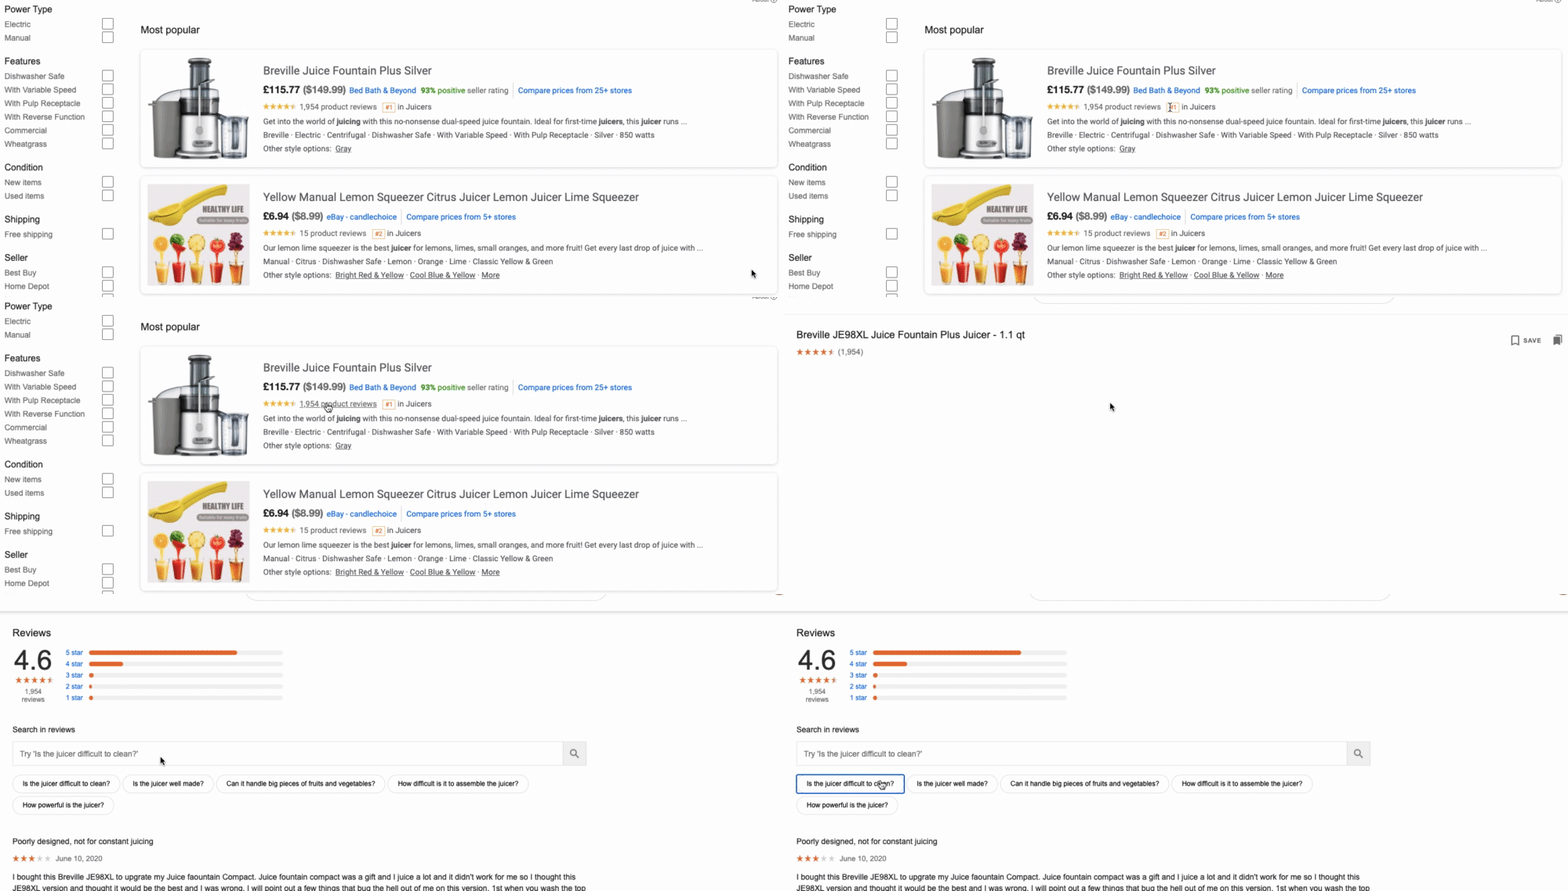
Think about it: if you’re looking to buy a juicer, you’re probably going to click the first listing you see that has many positive reviews.
Keep in mind that reviews are only shown on listings from advertisers that share all of their reviews with Google (both good and bad). You need a minimum of three reviews to get the rating stars under your listing.
Another cool thing about reviews is that they have
Add better pictures
Your product images are the first impression shoppers have of your product. For this reason, take your time in selecting the right image. Think about a picture that will motivate a potential buyer to
Here are some image tips to help you pick the best pic:
Use white backgrounds only. Dark backgrounds, watermarks, and logos don’t work. Though your product may look amazing in these variations, don’t use them on your listing. Learn the most common mistakes that may cost you sales.
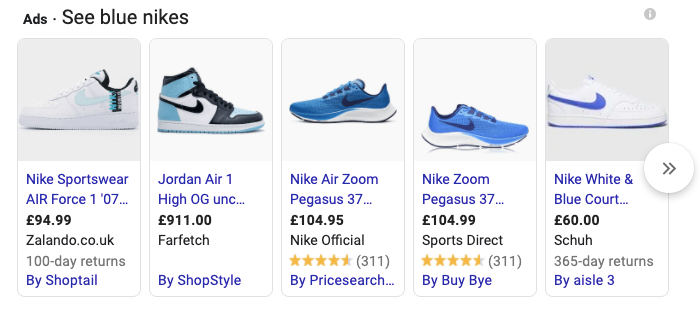
Think diagonally. Google Shopping displays product images in a square frame. Most listings don’t make efficient use of this space, and display products from a side view. This reduces the level of detail shoppers can see, which might make them click elsewhere.
Place your products diagonally. This way, you can provide more detail and fill the available space much more efficiently.
Check out the difference in detail between a side and diagonal view.

Use your own images. Stock images are a
For example, you can show a product from a different angle or add
Over to You
Google Shopping is a powerful way to reach new buyers when they are looking for a new brand or product to try out. Google’s immense reach and targeting capabilities make it a beneficial sales channel, and a great place to find customers.
However, achieving the results you expect will take time, patience, and hard work (unless you choose to automate Google Shopping).
Make sure to follow Google’s set guidelines and optimize your listings, and you’ll soon have shoppers flockling to your store, ready to buy.


